Introduction
You have chosen the materials. You understand the anatomy of a slipcase. Now comes the make‑or‑break step: measurement.
More custom slipcases fail because of poor measurement than any other cause. A slipcase that is 1mm too tight will scrape the book’s covers, resist insertion, and eventually damage the binding. A case that is 2mm too loose allows the book to shift, causing edge wear and a sloppy appearance on the shelf.
The good news? Perfect measurement is entirely learnable. This guide walks you through every tool, technique, and tolerance you need to size a slipcase correctly—whether you are building it yourself or sending specs to a professional maker.
By the end, you will never again guess at dimensions or cross your fingers hoping the book fits.
Why Standard Book Dimensions Are Not Enough
Many beginners assume they can look up a book’s published dimensions (from Amazon, a publisher’s website, or a catalog) and use those numbers. That is a fast route to disappointment.
Three reasons published dimensions fail:
Rounding – A book listed as 9″ x 6″ might actually be 9.1″ x 5.9″. Those tenths matter.
No dust jacket – Published dimensions usually exclude the jacket, which adds 1–2mm of height and width.
Variation within print runs – Even identical ISBNs can vary by 0.5–1mm due to trimming differences at the printer.
The only reliable method: Measure the actual physical book you intend to house, using the correct tools and technique. Never rely on templates provided by book publishers.
Essential Measuring Tools
Do not rely on a standard plastic ruler or a cloth tape measure. Invest in these tools for accuracy within 0.5mm:
| Tool | Why it matters | Approx. Cost |
|---|---|---|
|
Measures thickness and small dimensions to 0.01mm |
$20–40 |
|
|
Steel ruler (300mm / 12″) |
$10–15 |
|
|
Checks that book corners are square (they often are not) |
$8–12 |
Amazon links provided in case you would like to buy these tools.
What to avoid:
Soft fabric tape measures (they stretch)
Folding rulers (hinges introduce error)
Smartphone “measure” apps (not precise enough for slipcase work)
The Three Critical Dimensions
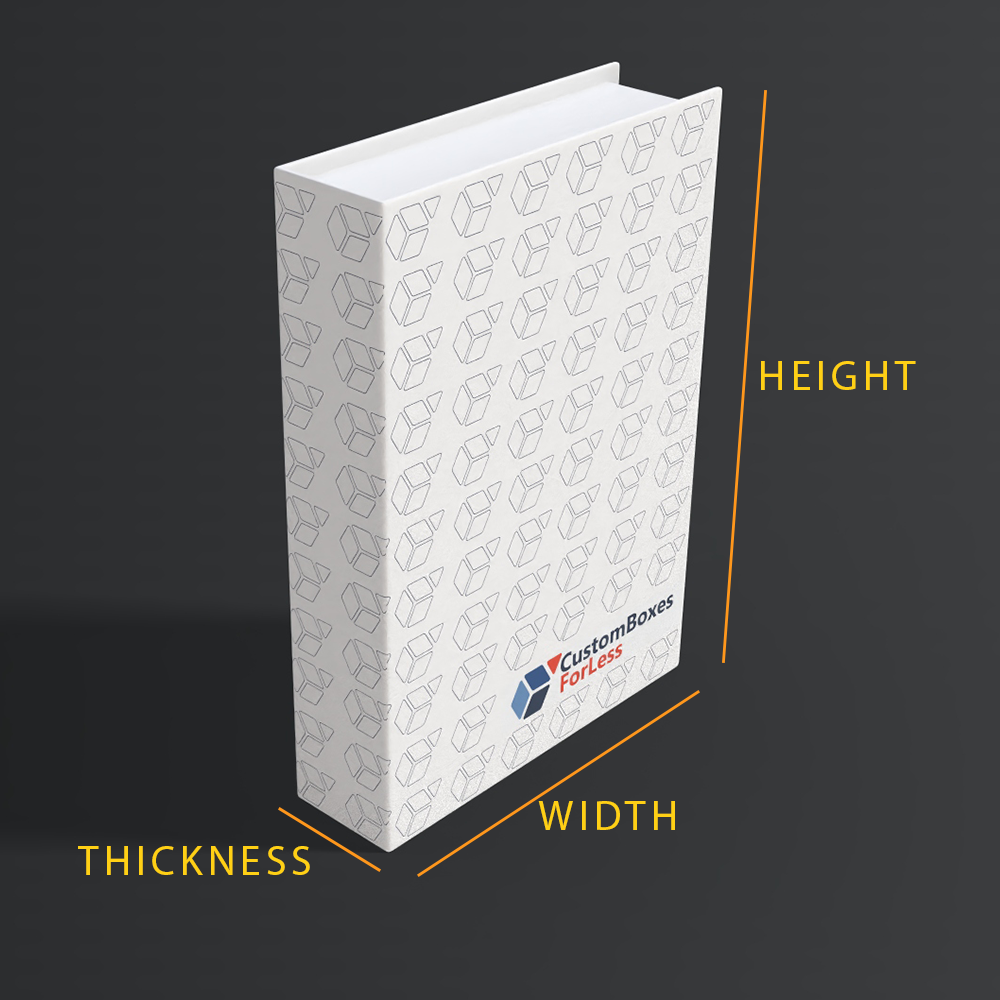
A slipcase requires exactly three measurements from the book:
Height – Top to bottom (spine vertical)
Width – Spine edge to fore‑edge (book closed)
Thickness (depth) – Total width of the book including covers, from front cover to back cover
Note: You do not measure the diagonal or any curved surfaces. Only these three orthogonal dimensions.
Step‑by‑Step Measurement Process
Step 1: Prepare the Book
Remove any loose inserts (ribbon markers, loose maps) – they will be stored separately or accounted for later.
If the book has a dust jacket, measure with the jacket on (unless you plan to store the book without it).
Close the book fully and press it gently to expel any trapped air between pages.
- Measure for dimensions as shown in the image.
Step 2: Measure Height
Place the book on a flat, hard surface (not a tablecloth or mat). Stand it upright with the spine facing you.
Use the steel ruler vertically against the top edge of the back cover.
Read the measurement at the bottom edge of the front cover.
Record to the nearest 0.5mm (e.g., 241.5mm).
Pro tip: Measure at the fore‑edge (opposite the spine) and again at the spine hinge. If these differ, your book is warped. Use the larger number.
Step 3: Measure Width
With the book still upright and closed:
Place the ruler horizontally from the spine edge to the fore‑edge.
Measure at the middle of the book (halfway up the height) to avoid any head‑to‑tail taper.
Some books are slightly trapezoidal (wider at the bottom). If so, measure at top, middle, and bottom. Use the largest width.
Step 4: Measure Thickness (Most Critical)
Thickness is where most errors occur. Use a digital caliper for best results.
Place the book flat on a table, front cover up.
Open the caliper jaws slightly wider than the book’s thickness.
Gently close the jaws until they just touch the front and back covers—do not squeeze. Squeezing compresses the book and gives a false low reading.
Take three readings: near the spine, near the fore‑edge, and in the middle. Use the largest of the three.
If you do not have a caliper, stack the book between two rigid blocks (e.g., offcuts of MDF) and measure the distance between blocks with your steel ruler. This is less accurate but workable.
The Golden Rule: Adding Clearance
Raw book measurements are never the final slipcase dimensions. You must add tolerance – small extra spaces that allow the book to slide in and out without friction.
Standard clearances (for hardcover books with dust jackets):
| Dimension | Clearance to add | Example (book = 240mm tall) |
|---|---|---|
|
Height |
+ 2mm total (+1mm top, +1mm bottom) |
242mm |
|
Width |
+ 2mm total (+1mm spine side, +1mm fore‑edge side) |
182mm (if book width = 180mm) |
|
Thickness |
+ 3mm total |
33mm (if book thickness = 30mm) |
Why thickness gets more clearance: Books swell with humidity and settle over time. Extra thickness clearance prevents binding.
Adjustments for Special Cases
| Book Type | Height Clearance | Width Clearance | Thickness Clearance |
|---|---|---|---|
|
Thin paperback (< 10mm thick) |
+1.5mm |
+1.5mm |
+2mm |
|
Heavy art book (> 3kg) |
+3mm |
+3mm |
+5mm |
|
Leather binding (no jacket) |
+1.5mm |
+1.5mm |
+2mm |
|
Book with loose inserts (maps, letters) |
+2mm |
+2mm |
+6mm (or more) |
Why thickness gets more clearance: Books swell with humidity and settle over time. Extra thickness clearance prevents binding.
Accounting for Book Taper and Warping
Books are rarely perfect rectangles. Common deformations:
Cocked spine – The book leans when standing. Measure width at the top and bottom separately; use the larger.
Splayed covers – Covers curve outward at the fore‑edge. Measure thickness at the spine hinge only, then add 1mm extra.
Rounded spine (backing) – Many hardcovers have a rounded spine. Measure thickness at the center of the spine’s curve, not the edges.
Rule for deformation: Never force a deformed book into a perfectly square slipcase. Instead, build the slipcase to accommodate the book’s actual shape, adding 1–2mm extra clearance on the affected dimension.
The Role of the Book’s Dust Jacket
Dust jackets cause more measuring mistakes than any other single factor.
If the book will ALWAYS be stored with its jacket on:
Measure the book with the jacket in place.
Add standard clearances (height +2mm, width +2mm, thickness +3mm).
If the book will SOMETIMES be stored without the jacket:
Measure the bare book.
Add a larger thickness clearance (+5mm) to accommodate the jacket when used.
Never: Measure the bare book and then add the jacket thickness manually unless you know the exact jacket paper weight. Just measure with the jacket on.
Measuring for Multi‑Volume Sets (Boxed Sets)
A slipcase for multiple books (e.g., a trilogy or a multi‑volume encyclopedia) follows the same principles but with a critical difference:
Stack the books side‑by‑side as they will sit in the case.
Measure the total width of the stack from the left cover of the first book to the right cover of the last book.
Add 4mm total clearance to thickness (2mm per side of the stack).
Individual spines may not align – measure the tallest book in the set for height, and the widest book for width.
Do not assume all volumes are identical. Print variations across years or editions are common.
Creating a Measurement Worksheet
Always use a standardized worksheet to avoid forgetting a dimension. Here is a template you can copy:
BOOK TITLE:
DATE:
HEIGHT (top to bottom):
+ Clearance (+2mm):
FINAL HEIGHT:
WIDTH (spine to fore‑edge):
+ Clearance (+2mm):
FINAL WIDTH:
THICKNESS (covers together):
+ Clearance (+3mm):
FINAL THICKNESS:
Special notes (taper, warping, jacket):
Print this worksheet and keep it with your slipcase project files. For repeat customers (e.g., a collector with multiple books), keep a digital folder of past measurements.
Common Measuring Mistakes (And How to Avoid Them)
| Mistake | Consequence | Prevention |
|---|---|---|
|
Measuring a closed book that is not fully pressed |
Thickness measurement too large → loose slipcase |
Press the book gently before measuring |
|
Using a ruler with a worn or rounded end |
Height/width off by 1–2mm |
Check the ruler’s zero mark against a known standard |
|
Forgetting to add clearance |
Slipcase too tight – book won’t insert |
Write “+X mm” on worksheet as a reminder |
|
Measuring only once |
Misses variation (book is not uniform) |
Take three measurements of each dimension |
|
Assuming paperback and hardback of same title are identical |
They almost never are |
Measure each book individually |
|
Measuring the book but not the slipcase interior after assembly |
Assembly errors (warped board) go undetected |
Always measure the finished slipcase interior before shipping |
How to Measure a Finished Slipcase (Quality Control)
Before you declare a slipcase finished, verify the interior dimensions:
Use the same steel ruler or caliper.
Measure the interior height from inside top to inside bottom.
Measure interior width from inside spine wall to inside fore‑edge wall.
Measure interior thickness from back wall to the opening edge.
Acceptable tolerances: ±0.75mm from your calculated final dimensions. Anything beyond ±1mm is a reject.
Also check:
The slipcase sits flat (no rocking).
The finger notch or ribbon pull operates smoothly.
The book slides in with light, even resistance but never requires force.
Real‑World Example: Measuring a Typical Hardcover Novel
Let’s walk through a real example.
Book: A 350‑page hardcover fiction book with a dust jacket.
Raw measurements (three each):
Height: 235.2mm, 235.1mm, 235.3mm → 235.3mm (use largest)
Width: 158.0mm, 158.2mm, 158.1mm → 158.2mm
Thickness: 28.5mm, 28.7mm, 28.6mm → 28.7mm
Apply clearances:
Height: 235.3 + 2 = 237.3mm
Width: 158.2 + 2 = 160.2mm
Thickness: 28.7 + 3 = 31.7mm
Final slipcase interior dimensions: 237.3mm (H) x 160.2mm (W) x 31.7mm (Thick)
Result: The book slides in smoothly with less than 1mm visible gap around the edges. The finger notch allows easy removal. Perfect.
When to Deviate from the Golden Rule
The +2/+2/+3 rule is a safe starting point, but experienced makers adjust for specific scenarios:
Very small books (pocket‑sized, < 150mm tall) – Reduce all clearances by 0.5mm (too much clearance makes the case feel floppy).
Very large books (coffee table, > 300mm tall) – Increase height clearance to +3mm to accommodate board warping.
Books stored vertically on a shelf that will never be moved – Minimum clearance (height +1mm, width +1mm, thickness +2mm) for a snug, invisible fit.
Books shipped via mail – Add +2mm to all dimensions to allow for shifting during transit.
Trust the rule first, then adjust based on experience with your specific books and environment.
Conclusion: Measure Twice, Cut Once
The old carpenter’s adage applies directly to slipcase making. Rushed or sloppy measurement cannot be fixed later. A slipcase that is too tight is waste; one that is too loose is disappointment.
By using the right tools, following a repeatable process, and respecting the need for clearance, you will achieve professional results every time. The extra ten minutes spent measuring carefully saves hours of frustration and wasted materials.
In the next article, we will compare slipcases vs. clamshell boxes – helping you decide which enclosure is right for your valuable books.